description: >- Database Migrations are an easy way to build and alter your database structure using cfscript and even deploy across different database engines
Database Migrations
With Wheels 2.x, you can now create, alter and populate your database via cfscript in an organized manner. Using custom CFC files, you can create an organized database schema, and move between versions easily, either programmatically, via the provided GUI, or via the CLI.
Getting Started
If you're new to this concept, the best way to get going is by following the [Migrator] link in the debug footer to load the built in GUI. Naturally, you will need your application's datasource setup and ready to go to get started.
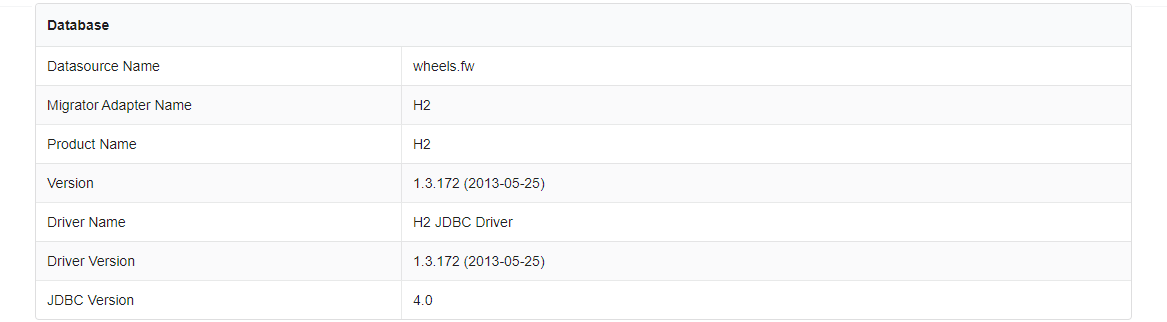
You can go to the info tab in the navbar and you will see a Database section, just so you can check you're running against the correct datasource. We're going to start by creating a simple template.
Creating your First Template
The Templating tab allows for creation of either a blank CFC file, or from a selection of pre-populated templates. Whilst none of these templates will provide all the information required for a complete database migration, they are a good starting point and fairly heavily commented.
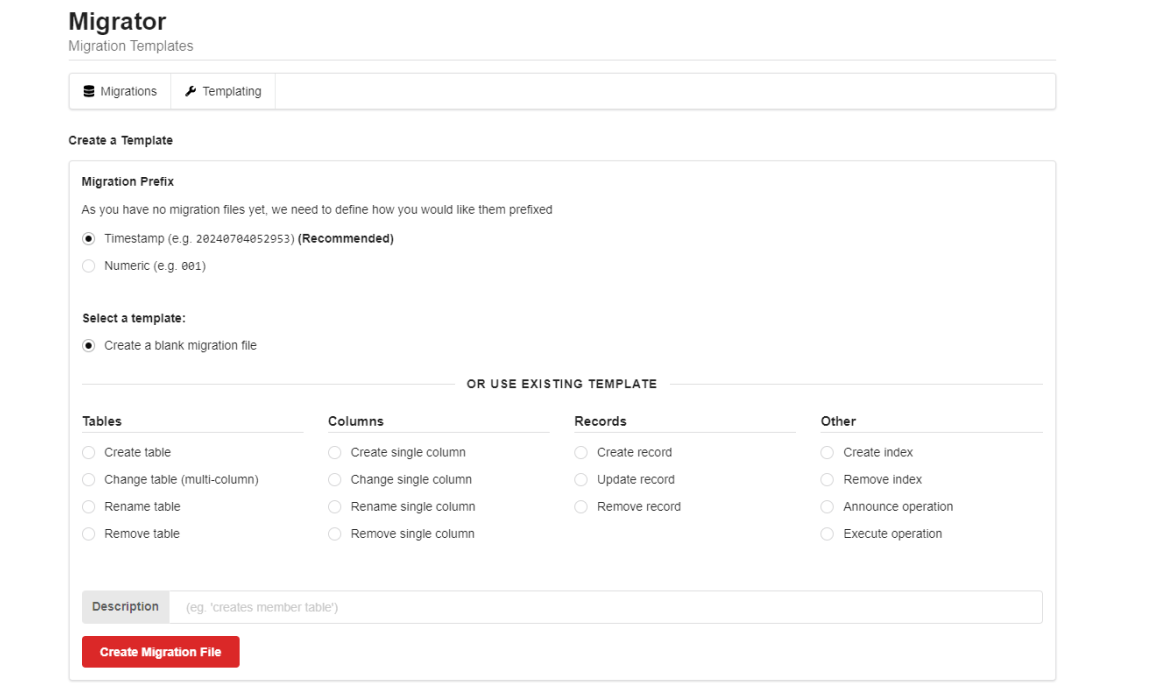
As we've not setup any migrations before, the system needs to know what prefix we want to use for our migration files. Each approach - Timestamp and Numeric is perfectly valid, but we recommend the Timestamp prefix if you're just starting out. Once you have a migration file, this section will disappear as it will get that info from the existing files.
For this tutorial, we're going to create the users table. So under Create a Template, we will select Create table and add a description of Create User Table.
Clicking on Create Migration File will then create a CFC at /app/migrator/migrations/20170420100502_Create_User_Table.cfc. The system will also display all messages at the bottom of the GUI whenever it does something - so for this command, we see The migration 20170420100502_Create_User_Table.cfc file was created
Populating the Create User Table Template
Next, open up the Create_User_Table.cfc template we just created. There are two functions to any migration file: up() and down().
up() will be executed when migrating your schema forward, and down() when you're rolling back.
The important concept to grasp is that anything which up() does, down() must undo.
{% code title="up()" %}
function up() {
	transaction {
		try {
			t = createTable(name = 'tableName');
			t.timestamps();
			t.create();
		} catch (any e) {
			local.exception = e;
		}

		if (StructKeyExists(local, "exception")) {
			transaction action="rollback";
			Throw(errorCode = "1", detail = local.exception.detail, message = local.exception.message, type = "any");
		} else {
			transaction action="commit";
		}
	}
}
{% endcode %}
Our default up() function will look something like this. Most of it you can actually ignore, as it's just wrapped in a transaction with some error handling. The important lines to look at are:
{% code title="up()" %}
t = createTable(name='tableName');
t.timestamps();
t.create();
{% endcode %}
createTable() is the command to actually make the table: so we need to change this to users.
{% code title="up()" %}
t = createTable(name='users');
t.timestamps();
t.create();
{% endcode %}
t.timestamps(); creates Wheels automatic timestamp columns of createdAt,updatedAt and deletedAt.
The t.create(); is the final statement which executes the actual action.
What goes up...
Remember, the down() function needs to reverse these changes. so in our down() code block, we're going to change the dropTable('tableName'); to `dropTable('users');
Adding additional columns
Whilst we could execute this template in it's current state (we have an up function which creates, and a down function which drops) we wouldn't get much in the actual table. We can use the same migration file to add additional lines to create some columns to store things like firstname. Here's an example of a slightly more fleshed out migration file to give you some inspiration:
{% code title="up()" %}
t = createTable(name='users');
t.string(
 columnNames='firstname,lastname,password',
 default='', allowNull=false, limit='60');

t.string(
 columnNames='username,passwordresettoken,apikey',
 default='', allowNull=true, limit='60');

t.string(
 columnNames='email,address1,address2,city,county,country,tel,www',
 default='', allowNull=true, limit='255');

t.string(
 columnNames='title,postcode,lang,locale,timezone',
 default='', allowNull=true, limit='15');

t.integer(columnNames='roleid', default='0', allowNull=false, limit='11');
t.datetime(columnNames='pwresettokenat', default='', allowNull=true);
t.datetime(columnNames='pwlastresetat', default='', allowNull=true);

t.timestamps();
t.create();
{% endcode %}
As you can see, you can create multiple columns in a single call, set default values, whether to allow null values, and so on.
At this point, we can get going on actually creating this table
- Make sure that multiple column names in "columnNames" are only separated with ",". Don't use spaces like ", " as that space becomes part of a column name which will cause problems.
Creating Tables with composite primary keys
While t = createTable(name='users'); will create a standard auto-increment numeric ID, sometimes you need to create a table which has a composite, or non standard primary key. In this example, we're setting id=false on the createTable() call to bypass the default behavior, then specifying our primarykeys separately via primaryKey():
t = createTable(name='rolepermissions', id=false);
t.primaryKey(name="roleid", allowNull=false, limit=11);
t.primaryKey(name="permissionid", allowNull=false, limit=11);
t.create();
This would be a typical setup for a join table where you have a many to many relationship. Alternatively this can be useful if you need to specify a UUID as a primarykey.
Running a migration
Returning to our migration GUI, we can now see some options under the Migrations tab.
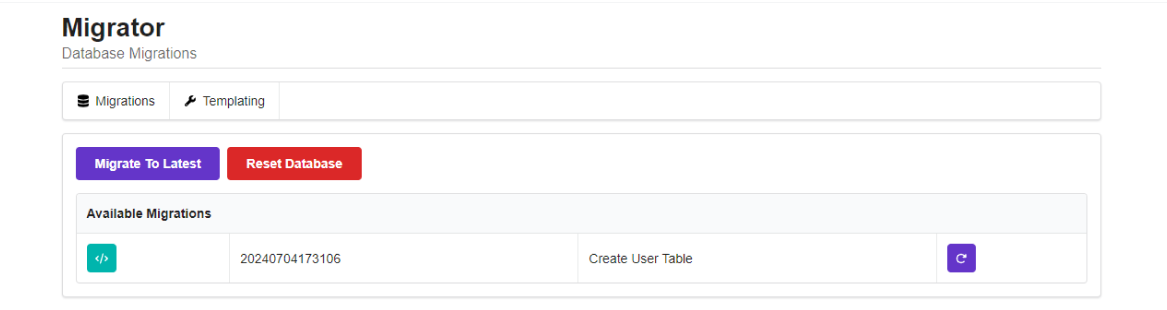
Simply click the button to migrate the database to our new version. From this screen we can also roll back to previous schema versions, or even reset the database back to 0.
Migrator Configuration Settings
| Setting | Type | Default | Description | | --------------------- | ------- | -------------------------------- | --------------------------------------------------------------------------------------------------------------------------------- | | autoMigrateDatabase | Boolean | false | Automatically runs available migration on applicationstart. | | migratorTableName | String | c_o_r_e_migrator_versions | The name of the table that stores the versions migrated. | | createMigratorTable | Boolean | true | Create the c_o_r_e_migrator_versions database table. | | writeMigratorSQLFiles | Boolean | false | Writes the executed SQL to a .sql file in the /app/migrator/sql directory. | | migratorObjectCase | String | lower | Specifies the case of created database object. Options are 'lower', 'upper' and 'none' (which uses the given value unmodified) | | allowMigrationDown | Boolean | false (true in development mode) | Prevents 'down' migrations (rollbacks) |
Setting Column Types
The Migrator needs to run across multiple DB engines, it avoids direct use of varchar, as different adapters will need to use different column types etc. Therefore string translates to VARCHAR.
For instance, here's the mySQL variants:
- biginteger = BIGINT UNSIGNED
- binary = BLOB boolean = TINYINT',limit=1
- date = DATE datetime = DATETIME
- decimal = DECIMAL
- float = FLOAT
- integer = INT
- string = VARCHAR',limit=255
- text = TEXT
- text (size="mediumtext") = MEDIUMTEXT (16MB)
- text (size="longtext") = LONGTEXT (4GB)
- time = TIME
- timestamp = TIMESTAMP
- uuid = VARBINARY', limit=16
Whereas SQL Server would use:
- primaryKey = "int NOT NULL IDENTITY (1, 1)
- binary = IMAGE
- boolean = BIT
- date = DATETIME
- datetime = DATETIME
- decimal = DECIMAL
- float = FLOAT
- integer = INT
- string = VARCHAR',limit=255
- text = TEXT
- time = DATETIME
- timestamp = DATETIME
- uniqueidentifier = UNIQUEIDENTIFIER
- char = CHAR',limit=10